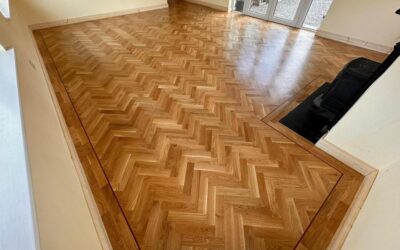
Embarking on a floor sanding project in Dublin or anywhere else can seem daunting at first. However, with a step-by-step guide, homeowners can gain a comprehensive understanding of the process, setting clear expectations for what lies ahead. This detailed guide will walk you through each stage of floor sanding, showcasing the precision and care professional floor sanders, like those at Artisan Flooring, bring to your wooden floors.
Step 1: Initial Assessment and Consultation
The journey to revitalised floors begins with an in-depth assessment of your wooden floors. Professionals will inspect the condition of your floors, identifying any major issues such as deep scratches, gaps, or unevenness. This initial consultation is crucial for determining the scope of the sanding project and selecting the appropriate techniques and equipment.
Step 2: Preparing the Area
Before the sanding process starts, it’s essential to prepare the area. This involves removing furniture, rugs, and any other items from the room to provide clear access to the floors. Professionals also ensure that the space is adequately sealed off from the rest of the property to minimise dust spread.
Step 3: Sanding the Floors
This is where the magic happens. Using state-of-the-art, dust-free sanding equipment, professionals meticulously sand down the wooden floors. Starting with coarse-grit sandpaper to remove the old finish and surface imperfections, they gradually move to finer grits to smooth out the wood. This step is performed with the utmost care to achieve a uniform finish without damaging the floors.
Step 4: Detail Sanding
Edges and corners that can’t be reached by the larger sanding machines are addressed next. Using hand-held sanders or edging tools, professionals ensure these areas are not overlooked, guaranteeing a consistent finish across the entire floor.
Step 5: Vacuuming and Cleaning
Once the main sanding is complete, the entire area is thoroughly vacuumed to remove all dust and debris from the sanding process. A tack cloth or a slightly damp mop might be used to pick up any residual dust, ensuring the floor is perfectly clean before the finishing touches are applied.
Step 6: Applying the Finish
Choosing the right finish is crucial for protecting your floors and enhancing their natural beauty. Based on your preference and the type of wood, professionals can apply a variety of finishes, including oils, waxes, or lacquers. This step is carefully executed to ensure an even application and the desired aesthetic outcome.
Step 7: Final Inspection and Care Instructions
The final step involves a thorough inspection of the newly sanded and finished floors. Professionals will check for any missed spots or imperfections. Once satisfied, they will provide you with care instructions to maintain the beauty and durability of your floors.
By breaking down the process into these detailed steps, homeowners can appreciate the intricacy and expertise involved in professional floor sanding. Artisan Flooring takes pride in each phase, ensuring your floors are not just sanded but beautifully restored. For more information on our services or to schedule a consultation, visit
Artisan Flooring.
Embarking on a floor sanding project with a clear understanding of the process can transform a seemingly complex task into a straightforward and satisfying project, ensuring your wooden floors look their best for years to come.